I want the disks in my Proxmox servers to be useless to anyone who walks off with them. Here’s the manual-unlock setup: Proxmox VE 9 on Debian 13, with root, swap and local guest storage inside one LUKS-encrypted container. You enter a passphrase at boot. The EFI System Partition and /boot stay unencrypted.
This starts with a fresh-disk installation, so choosing the target disk wipes its contents. If you’re rebuilding an existing node, back up the guests to PBS or migrate them elsewhere first, as I covered in part one. I would disconnect unrelated disks where possible, just to make picking the wrong one harder. If the disk previously held sensitive plaintext, consider sanitising it too: creating an encrypted volume won’t erase every old sector. Proxmox’s backup documentation covers guest backup and restore.
I’m using Proxmox’s official Debian installation route so I can choose the encrypted layout before adding Proxmox’s own packages. Proxmox generally recommends its ISO installer and describes the Debian route for advanced users in Install Proxmox VE on Debian 13 Trixie. The particular LUKS/LVM layout below is my worked example.
1. Prepare the disk, network and console
Download the Debian 13 amd64 netinst installer and check Debian’s published checksum. You’ll need an x86-64 machine with virtualisation enabled and a local or out-of-band console. Boot the installer in UEFI mode. I’m following Debian’s GRUB path here; switching to systemd-boot or encrypting /boot needs a different setup.
For this example I used a 64 GiB disk: 20 GiB of the encrypted volume group for the initial root and swap volumes, then a 24 GiB thin pool for guests. That leaves some space for growth and maintenance. It’s small demonstration sizing, though. Allow more root space on a physical host if you’ll keep logs, ISOs and templates there, and leave room for temporary operations before you start installing.
Choose a management address that will stay put, along with the gateway, DNS servers and hostname. A DHCP reservation can do that where your network supports it; the bridge example later uses a static address. The hostname needs to resolve to the reachable management address, but you don’t need a public IP. I’ve used pve01.home.arpa and reserved example addresses below, so replace them with your own.
2. Install Debian with encrypted LVM
- Work through language, keyboard and networking. Choose a hostname and your intended local DNS domain.
- Set a strong root-account password, separate from the disk-unlock passphrase. Proxmox’s initial
root@pamweb login uses this account. - At partitioning, choose Guided — use entire disk and set up encrypted LVM, then select the intended empty target disk.
- Select the scheme with all files in one partition. Read every disk-write confirmation: encrypted LVM setup can write destructive changes before the final summary.
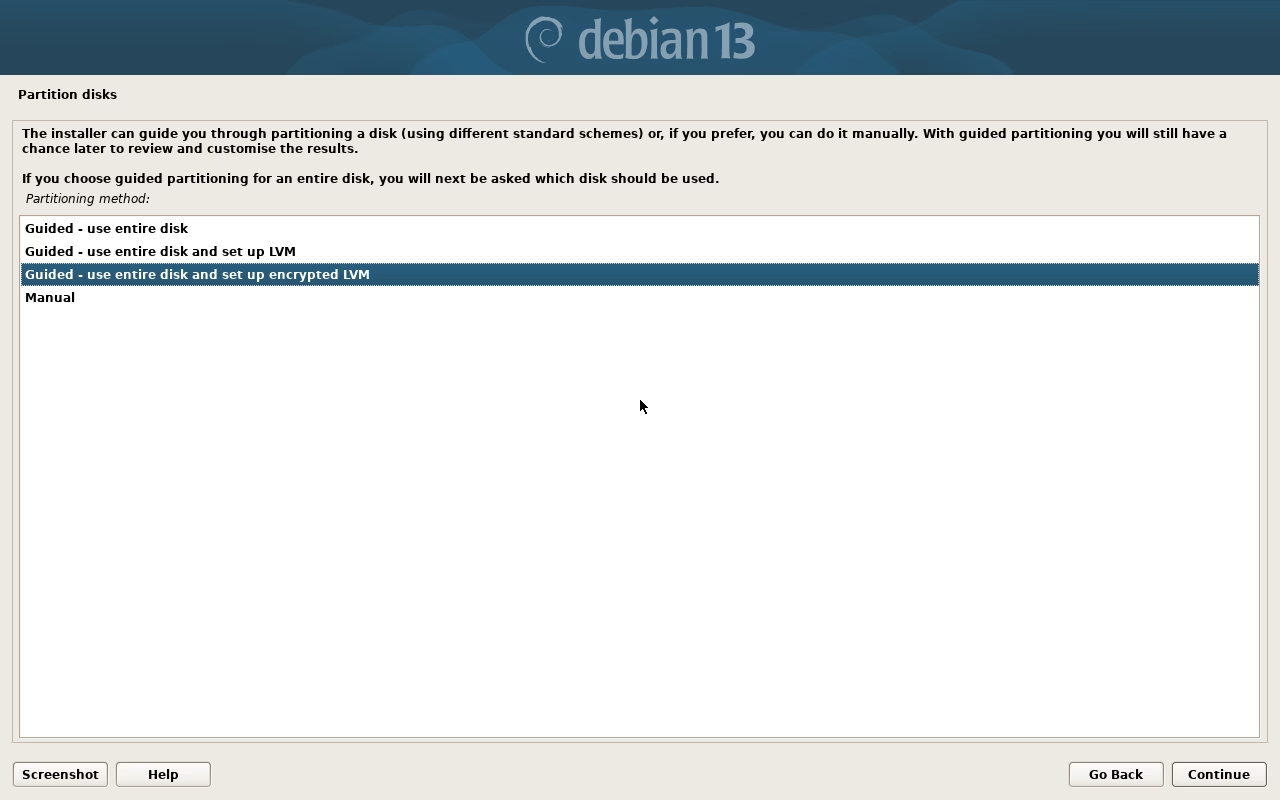
The installer may offer to erase the encrypted area. Let it finish if you’re reusing a disk. I skipped it for these screenshots because this was a newly created, empty virtual disk.
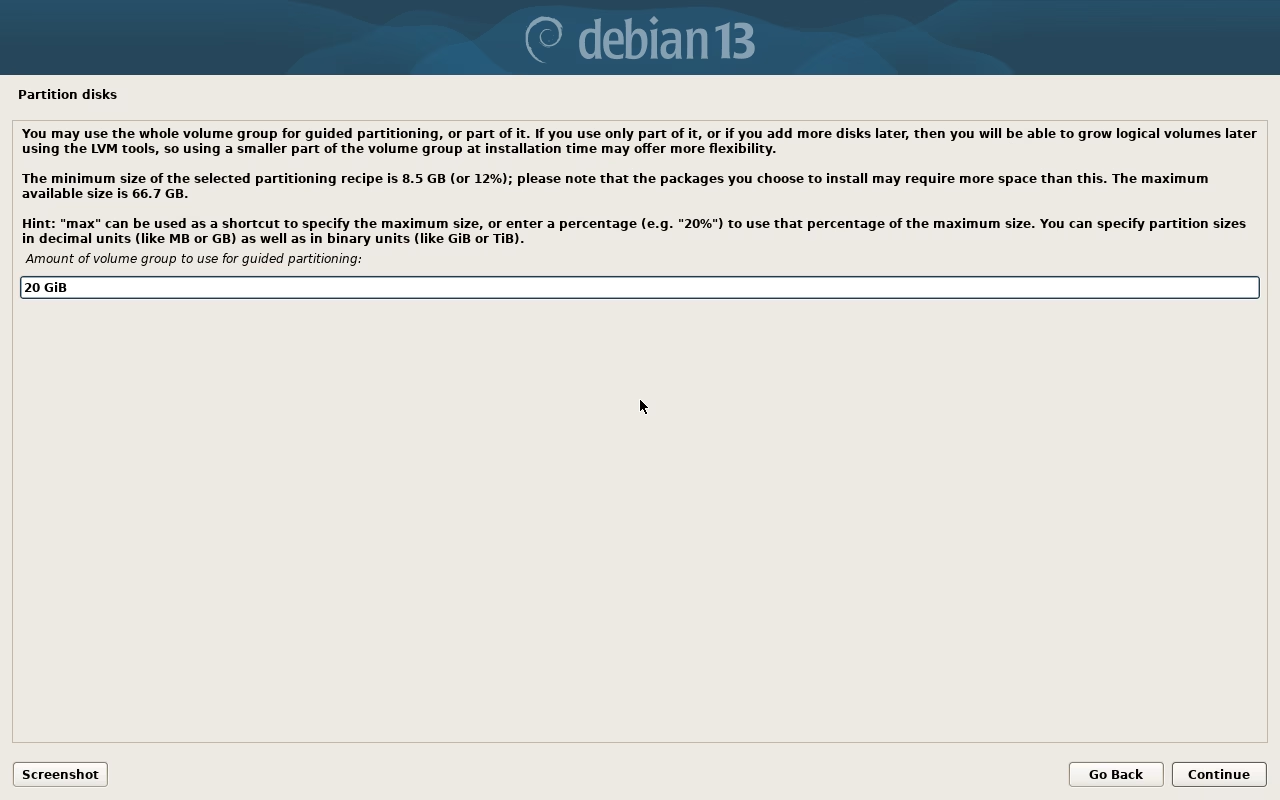
Choose a strong disk-unlock passphrase and save it somewhere secure. When the installer asks how much of the volume group to use, enter 20 GiB for this example rather than accepting the maximum. That limits the initial logical volumes and leaves the remaining capacity as free extents for later.
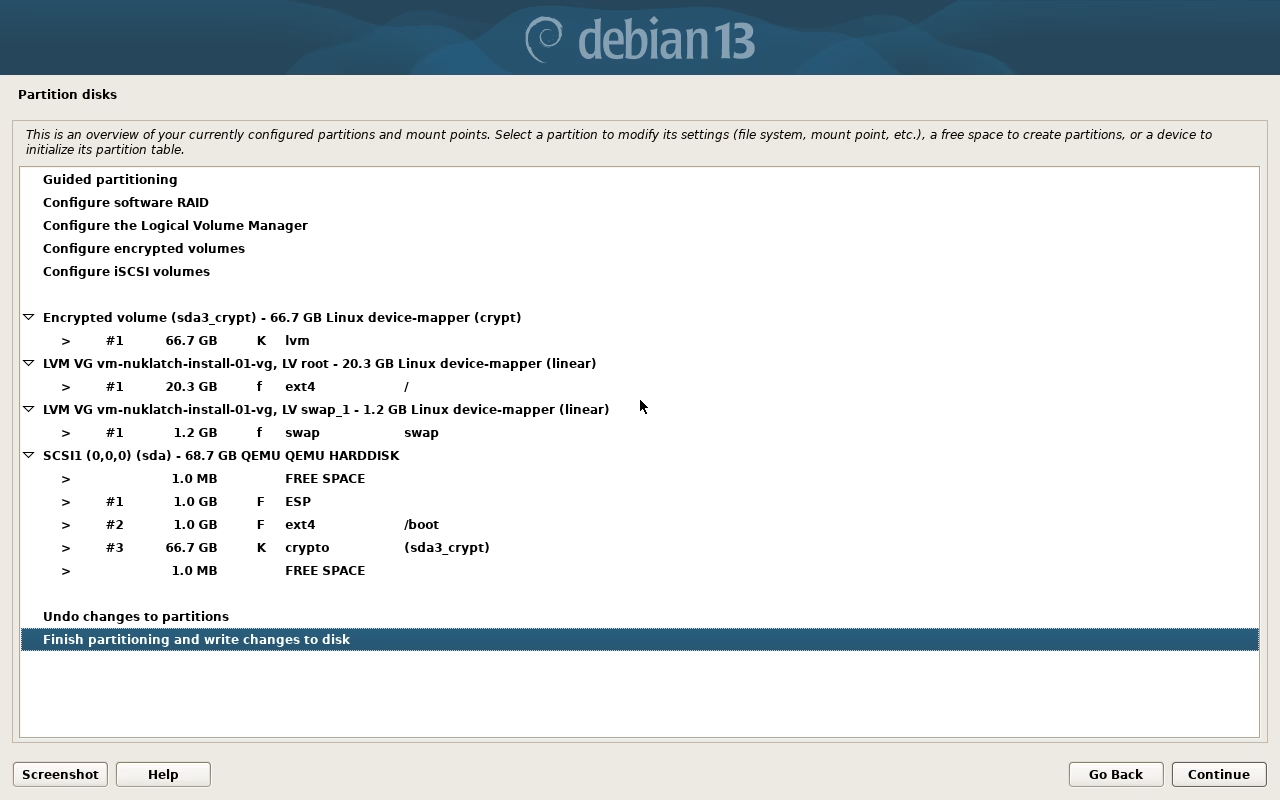
Check the partition summary before accepting it. You should have an unencrypted EFI System Partition and /boot, then an encrypted device holding the LVM root and swap volumes. Root mounts at /. If you’re following the thin-pool step later, don’t let root take all the space. The volume names and root/swap split can vary, so note what your installer creates. Debian’s partitioning instructions cover the guided and manual options.
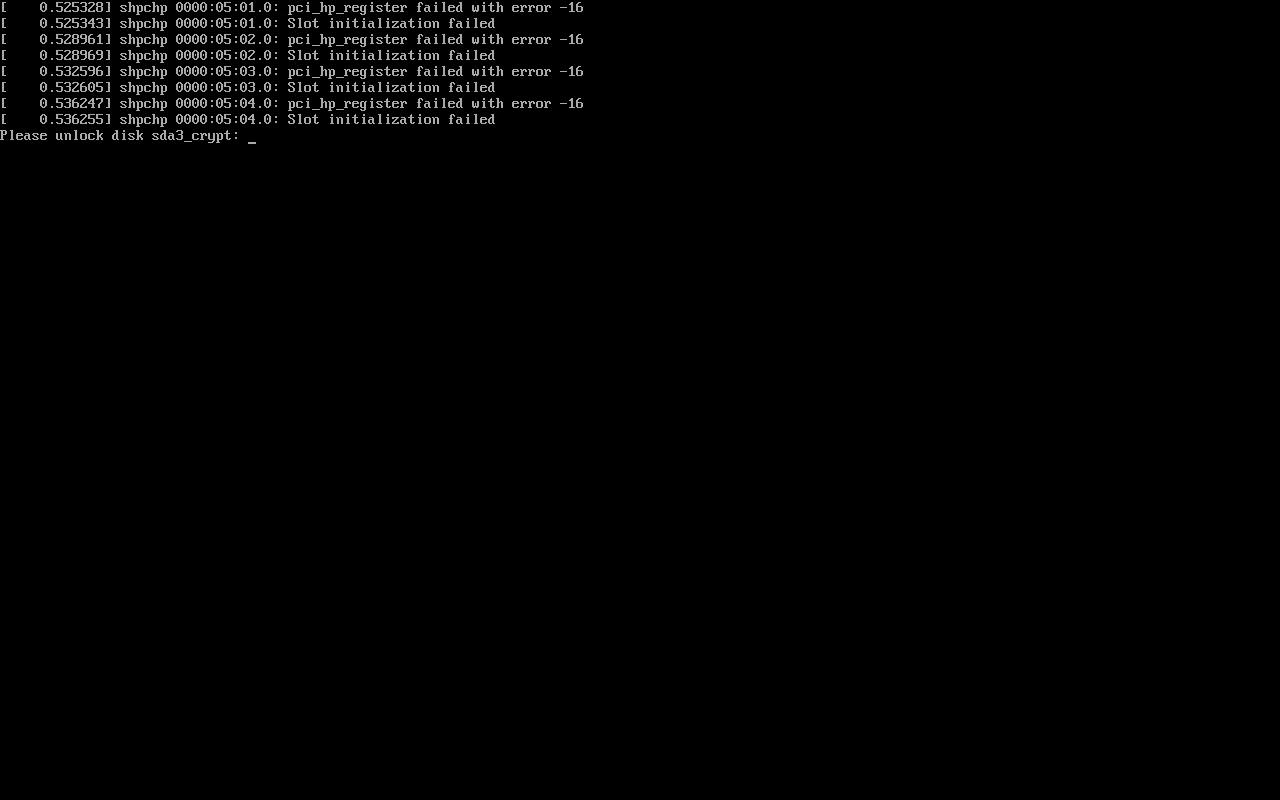
Choose a working Debian mirror, then install the SSH server and standard system utilities. There’s no need for a desktop. If you finish without a mirror, sort out the Debian Trixie, updates and security repositories before the APT steps below. Finish the install, remove the installation medium and reboot. Enter the LUKS passphrase at the console; this first boot checks that Debian can unlock and mount root.
3. Check the base installation and hostname
Become root with su -, or sudo -i if your account has sudo. The commands below run in a root Bash shell. Work through them a stage at a time and sort out any errors before moving on. First, have a look at what Debian installed:
test -d /sys/firmware/efi && echo 'Booted using UEFI'
cat /etc/os-release
lsblk -o NAME,SIZE,TYPE,FSTYPE,MOUNTPOINTS
vgs
lvs
ip -br address
ip route
hostname -f
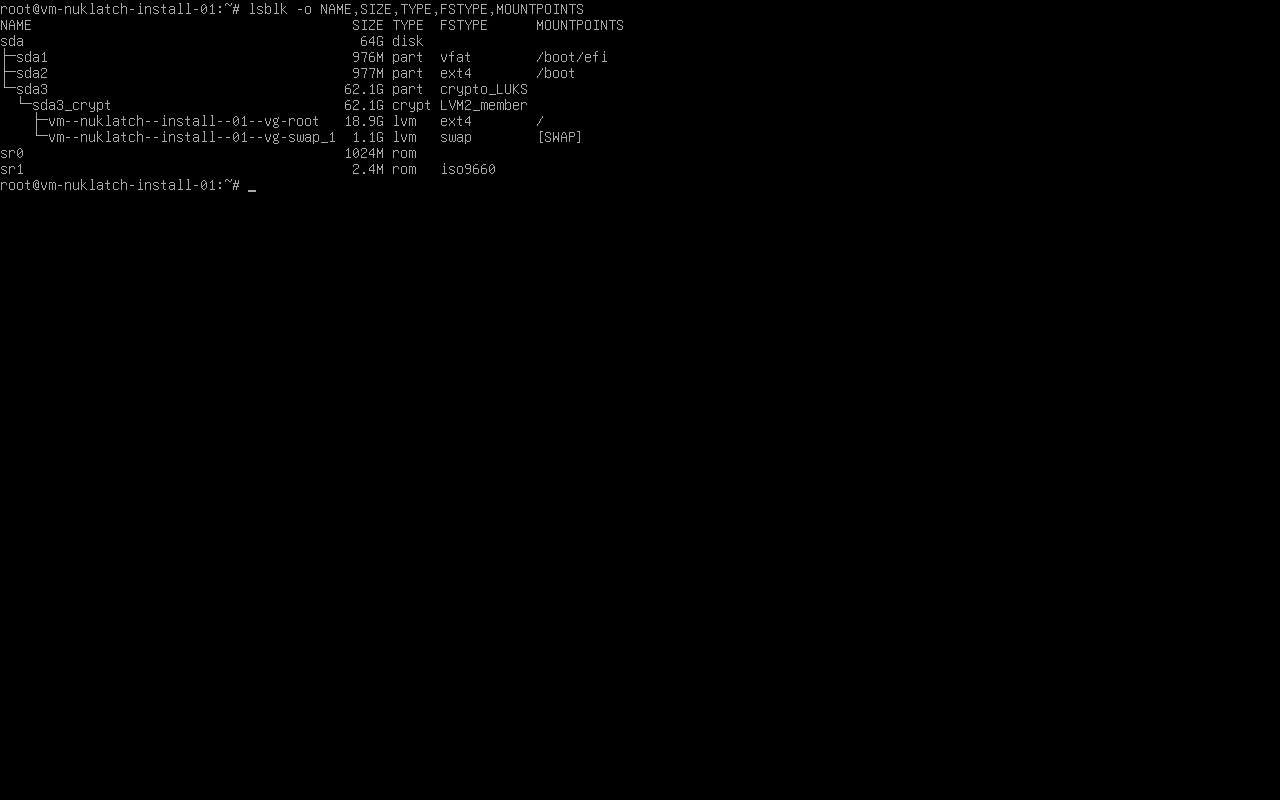
In the device tree, root and swap should sit beneath the encrypted mapping. Check that vgs shows enough free space for your thin pool. If it doesn’t, fix the layout while the installation is still empty.
In /etc/hosts, map the node name to its management address and keep the localhost entry. Replace the node’s 127.0.1.1 entry if it has one. For example:
127.0.0.1 localhost
192.0.2.10 pve01.home.arpa pve01
Keep the IPv6 localhost entries you need, replace the example address and names, then check they resolve:
hostname -f
getent ahostsv4 pve01.home.arpa
4. Add the Proxmox repository and boot its kernel
Leave Debian’s Trixie, updates and security repositories enabled. I’m adding Proxmox’s no-subscription repository here, which Proxmox describes as suitable for testing and non-production use. For production, use the enterprise repository with a suitable subscription. The definitions and keyring instructions are in Package Repositories.
apt update
apt install ca-certificates wget
wget https://enterprise.proxmox.com/debian/proxmox-archive-keyring-trixie.gpg \
  -O /usr/share/keyrings/proxmox-archive-keyring.gpg
sha256sum /usr/share/keyrings/proxmox-archive-keyring.gpg
Check the downloaded keyring against the checksum in the official repository documentation. When I drafted this, the bootstrap SHA256 was 136673be77aba35dcce385b28737689ad64fd785a797e57897589aed08db6e45. If a fresh download differs, check the official value before carrying on. Once the keyring package owns the file, legitimate package updates can change its checksum.
cat > /etc/apt/sources.list.d/proxmox.sources <<'EOF'
Types: deb
URIs: http://download.proxmox.com/debian/pve
Suites: trixie
Components: pve-no-subscription
Signed-By: /usr/share/keyrings/proxmox-archive-keyring.gpg
EOF
apt update
apt full-upgrade
apt install proxmox-default-kernel
systemctl reboot
After the reboot, unlock the disk again and check the running kernel. It should end in -pve before you install the rest of Proxmox:
uname -r
If it doesn’t, select the installed Proxmox kernel in GRUB and sort out the boot selection first. Keep the Debian kernel for now as a fallback.
5. Install the platform and configure its bridge
apt install proxmox-ve postfix open-iscsi chrony ifupdown2
Choose the Postfix settings that suit your notifications. Afterwards, check the repositories and disable enterprise entries you can’t access, including Ceph’s if present. Remove any duplicates and get a clean apt update before continuing.
Next comes the bridge that connects the guests. From the console, edit /etc/network/interfaces using your actual wired interface name. Put the host address and default gateway on vmbr0, leaving the physical interface in manual mode. All the addresses in this 192.0.2.0/24 example need replacing:
auto lo
iface lo inet loopback

iface eno1 inet manual

auto vmbr0
iface vmbr0 inet static
    address 192.0.2.10/24
    gateway 192.0.2.1
    bridge-ports eno1
    bridge-stp off
    bridge-fd 0

source /etc/network/interfaces.d/*
Remove the old uplink’s conflicting DHCP or static definitions, checking included files too. Keep any IPv6 configuration you need and make sure DNS still works. If you use a DHCP reservation, adapt the bridge configuration and keep the hostname mapping consistent rather than copying this static stanza. Keep the console open while applying it… losing SSH halfway through a network change is no fun.
ifreload -a
systemctl is-enabled networking
ip -br address
ip route
getent ahostsv4 deb.debian.org
If networking is unexpectedly disabled, find out why before rebooting. Check management access from another machine too. Proxmox recommends ifupdown2; its network documentation explains how the traditional ifdown/ifup approach can disconnect guests when cycling a bridge.
6. Create encrypted local guest storage
The guest thin pool goes inside the encrypted volume group. Check with pvs and lsblk that its physical volume is the decrypted LUKS mapping, then get the VG name from vgs. Don’t guess it, or create a second data pool or local-lvm storage ID if either already exists. I’m creating 24 GiB here, with space left for extension, metadata and repairs:
vgs
pvs -o pv_name,vg_name,pv_size,pv_free
lvs
pvesm status
read -r -p 'Encrypted volume group name from vgs: ' VG
lvcreate --type thin-pool -L 24G -n data "$VG"
pvesm add lvmthin local-lvm --vgname "$VG" --thinpool data \
  --content images,rootdir
pvesm status
lvs -a -o lv_name,vg_name,lv_size,segtype,data_percent,metadata_percent,devices
Leave the thin pool unformatted and unmounted. ISOs and templates can stay on directory storage under encrypted root; guest disks and container filesystems go in the thin pool. Keep an eye on data and metadata usage, because thin provisioning won’t conjure up more disk space. Proxmox’s LVM-thin documentation has more detail.
7. Add and test a recovery credential
Before putting guests on this, I want another way back into the disk. LUKS encrypts the data with a volume key, and its header holds protected copies of that key in keyslots. Your passphrase opens one of those copies. Adding a recovery passphrase gives you another route to the same data without rewriting the disk.
Either ordinary LUKS passphrase can unlock the whole container. Adding one doesn’t require two people to unlock it, separate the guests or change the data-encryption key. Pick a distinct recovery passphrase and keep it securely outside this host.
Find the outer LUKS partition using lsblk -f and /etc/crypttab. That’s the partition to enter below, rather than its decrypted mapper or an LV. First mount a separately protected recovery medium at /mnt/recovery:
lsblk -f
cat /etc/crypttab
read -r -p 'Outer LUKS partition, for example /dev/nvme0n1p3: ' LUKS_DEVICE
cryptsetup luksDump "$LUKS_DEVICE"
umask 077
mountpoint -q /mnt/recovery && \
  cryptsetup luksHeaderBackup "$LUKS_DEVICE" \
    --header-backup-file /mnt/recovery/host-header-before.img && \
  cryptsetup luksAddKey "$LUKS_DEVICE"
cryptsetup luksDump "$LUKS_DEVICE"
This chain only adds the key after it has checked the recovery medium is mounted and saved the header. If it fails, stop and fix it before testing or removing slots. luksAddKey asks for an existing passphrase, then the new one. Check the updated slot list: the installer commonly starts at slot 0, but use the slot numbers you actually see. Enter the new passphrase interactively to test its slot:
read -r -p 'New recovery keyslot number from luksDump: ' RECOVERY_SLOT
cryptsetup open --test-passphrase --key-slot "$RECOVERY_SLOT" "$LUKS_DEVICE"
echo "Test exit status: $?"
mountpoint -q /mnt/recovery && cryptsetup luksHeaderBackup "$LUKS_DEVICE" \
  --header-backup-file /mnt/recovery/host-header-after.img
A zero test status means it worked. Keep the original passphrase and test that independently as well. Treat header backups as sensitive recovery material; they aren’t backups of your data. An old header and a passphrase that worked when it was saved can still unlock the disk after you’ve removed that passphrase from the live header, so protect old copies too. The cryptsetup manuals cover adding keys, testing a specific slot and header backups.
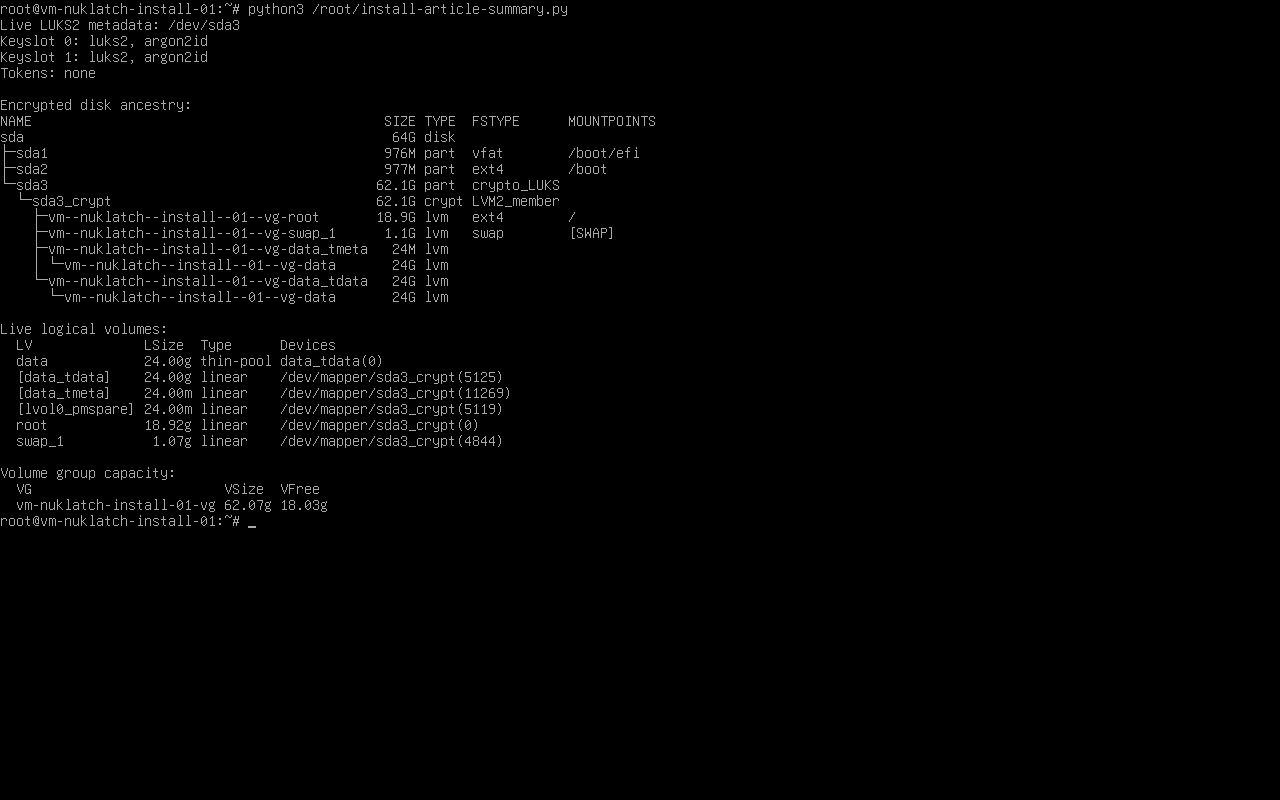
You can remove an old passphrase if you no longer need it, but test every credential you’re keeping first. Don’t remove the last working key. Run this interactively and enter the old passphrase you want to remove:
cryptsetup luksRemoveKey "$LUKS_DEVICE"
Don’t pipe in the passphrase or use batch mode, as that can suppress the last-key warning. After removal, test the retained slots again and save a fresh protected header backup. The removal manual explains the risk.
8. Reboot and verify the finished host
Before adding guests, reboot again with the console available. This time, use the recovery passphrase, check the Proxmox kernel and network, then open https://YOUR-MANAGEMENT-ADDRESS:8006/. A fresh install normally has a locally generated certificate, so check you’ve reached your own host. Log in as root using the Linux PAM realm and root-account password (the account password, rather than the LUKS passphrase you entered at boot).
uname -r
pveversion -v
lsblk -f
pvesm status
systemctl --no-pager --full status pveproxy
Once the checks pass, you can tidy up the Debian kernels if you want to. List the installed kernel packages and remove only the exact Debian packages you’re retiring, then run update-grub. Avoid wildcards and keep a working Proxmox kernel. Check whether os-prober is installed too; remove it if this dedicated host doesn’t need it.
That leaves the host and local guest storage encrypted, with a passphrase needed after every restart. Once the host is unlocked, encryption won’t stop an administrator or an attacker who controls it. The clear boot partitions also leave boot tampering outside this setup; verified boot needs separate work. I’ll tackle automatic network-based unlocking separately, because its early network setup is another stage again from the Proxmox bridge.
I took these screenshots on a fresh Debian 13.7 amd64 UEFI VM: manual root unlocking, two independently tested passphrase slots and a 24 GiB thin pool beneath LUKS worked. I tested the second passphrase against its slot, but didn’t boot with it separately. The mirror was unreachable, so I couldn’t rerun the documented Proxmox package, bridge and storage-registration steps on this VM; earlier BIOS-based testing covered Proxmox boot and encrypted guest storage. I haven’t tested every hardware or boot combination.
Leave a Reply