Header photo: illustrative Zotac RTX 3060, Qurren / Wikimedia Commons, CC BY-SA 4.0.

I wanted GPU acceleration for the local LLM broker in an unprivileged LXC. The working arrangement keeps the NVIDIA driver on Proxmox and passes its device nodes and user-space libraries through to the container.
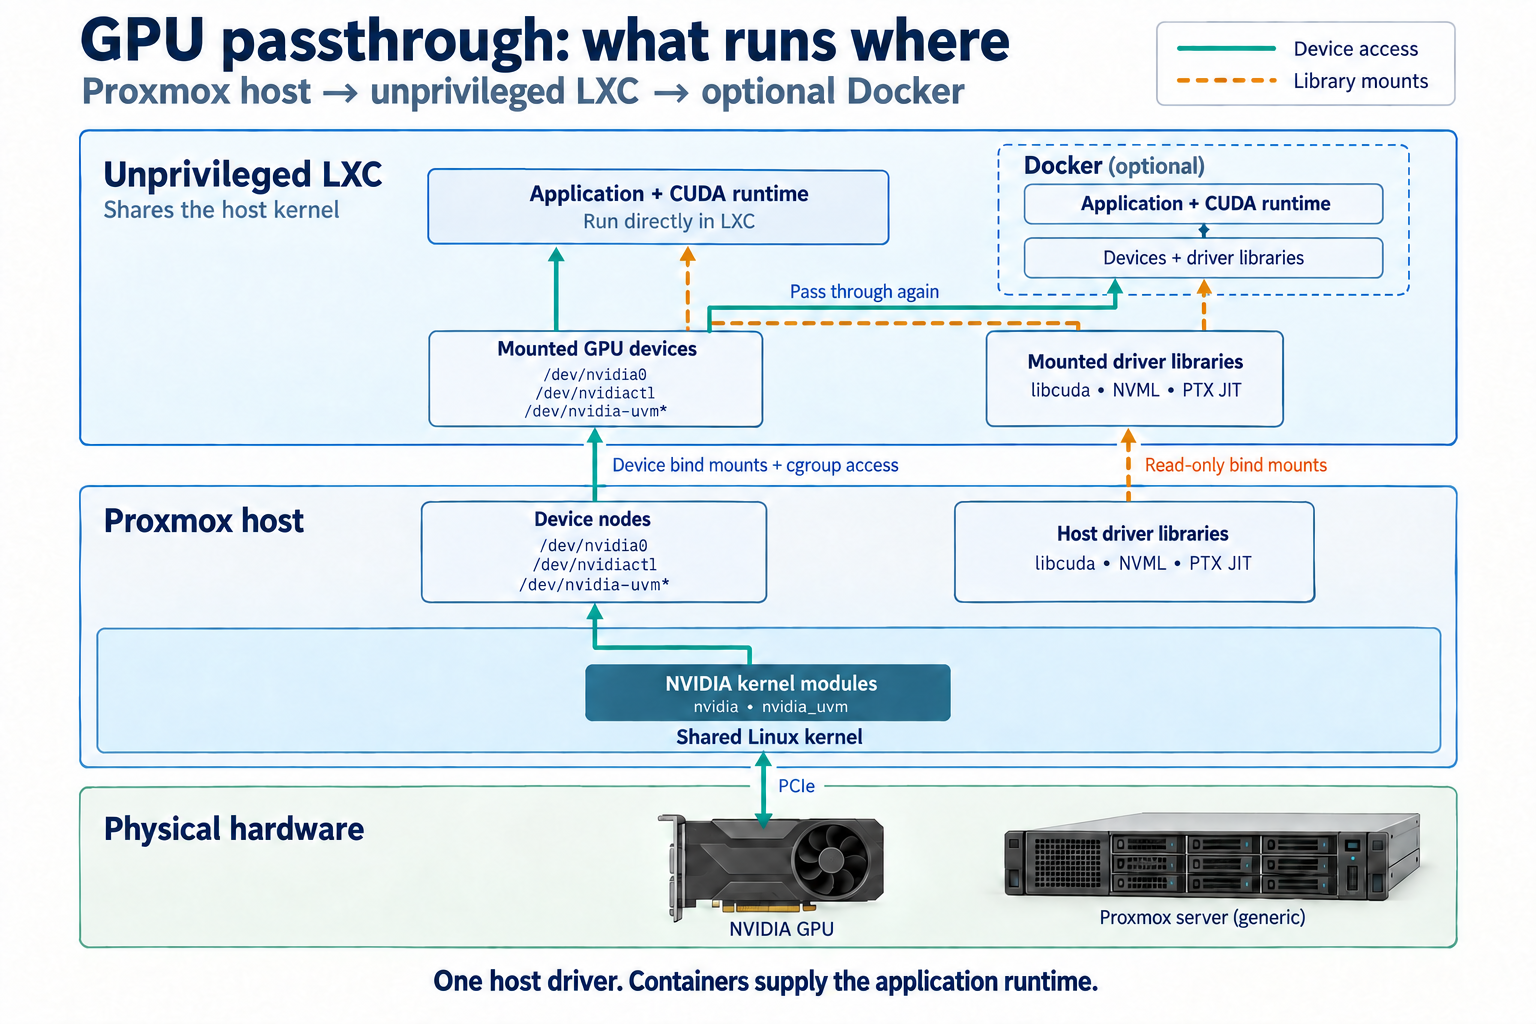
For LXC, GPU passthrough means sharing the host’s driver. The GPU stays bound to NVIDIA on the Proxmox host; the container uses it through the exposed devices. VFIO and vGPU configuration aren’t involved.
| Where | What belongs there |
|---|---|
| Proxmox host | NVIDIA kernel modules, matching PVE headers and driver libraries |
| Unprivileged LXC | Selected GPU devices, read-only driver libraries, application runtime |
| Docker, if used | The same devices and libraries passed through the second container boundary |
This walkthrough targets Proxmox VE 9 on Debian 13, x86-64, using NVIDIA’s open kernel module. It covers Turing and newer GPUs; NVIDIA’s supported-device table lists the model names and PCI IDs.
1. Get the host driver working
An older packaged NVIDIA driver failing to build against a newer PVE kernel was one of the snags. The fix was NVIDIA’s current packaged driver and headers for the exact PVE kernel. Start with an updated host, finish any pending kernel reboot, and run these as root with GPU containers stopped:
pveversion
uname -r
cat /etc/os-release
lspci -nn -d 10de:
Check that the OS reports VERSION_ID="13" and the kernel ends in -pve. Match the GPU’s PCI ID to the supported-device table above. The repository below is specifically for Debian 13; don’t add it to a Debian 12 host.
Enable contrib in the Debian repository’s Components: line, normally in /etc/apt/sources.list.d/debian.sources, preserving its other components. Then install the matching PVE headers and NVIDIA’s repository keyring:
apt update
apt install proxmox-default-headers "proxmox-headers-$(uname -r)" \
    dkms build-essential wget
wget https://developer.download.nvidia.com/compute/cuda/repos/debian13/x86_64/cuda-keyring_1.1-1_all.deb \
    -O /tmp/cuda-keyring.deb
dpkg -i /tmp/cuda-keyring.deb
apt update
apt-cache policy nvidia-driver-cuda nvidia-kernel-open-dkms
Use the current compute driver from developer.download.nvidia.com. The Candidate: lines show the versions APT will install; the version table shows their repository. If an old pin or hold keeps APT on another branch, inspect apt-mark showhold and /etc/apt/preferences.d/ before proceeding. Don’t mix driver components from different branches.
apt -s install nvidia-driver-cuda nvidia-kernel-open-dkms
# Check the proposed transaction, then:
apt install nvidia-driver-cuda nvidia-kernel-open-dkms
dkms status
modinfo -k "$(uname -r)" -F version nvidia
The driver isn’t selected from a PVE-version lookup table. APT selects the packaged release; DKMS builds its kernel interface against your exact PVE headers. In dkms status, the NVIDIA entry must contain the full kernel string from uname -r and end in installed. That proves the build/install step; loading the module is a separate check.
If it fails, read the make.log path printed by DKMS. Missing headers mean fixing the matching proxmox-headers-… package; compiler errors about changed kernel functions can mean an older driver against a newer kernel. Check the candidate version and NVIDIA’s driver issue tracker using the exact driver version, kernel and error. If the current packaged driver still won’t build, stop there; don’t reboot into an unbuilt module or silently downgrade PVE.
After a successful build, reboot the host in its maintenance window, then run nvidia-smi -L and lspci -nnk -d 10de:. The GPU should use nvidia. If another driver owns it, check the kernel journal; if Secure Boot rejects the module, follow Proxmox’s DKMS signing procedure. The package/repository steps follow NVIDIA’s Debian compute-only instructions.
2. Check UVM before starting the LXC
# Proxmox host
modprobe nvidia_uvm
ls -l /dev/nvidia0 /dev/nvidiactl \
      /dev/nvidia-uvm /dev/nvidia-uvm-tools
This caught us out: nvidia-smi can work while CUDA cannot initialise. UVM and its device nodes need to exist before the container starts. Loading the module afterwards doesn’t repair a missing bind mount in an already running LXC.
3. Add the devices and libraries
Stop the unprivileged Debian LXC and back up /etc/pve/lxc/<CTID>.conf. The entries below go in that file, alongside its existing configuration. Run this in Bash on the Proxmox host to print the device entries:
for dev in /dev/nvidia0 /dev/nvidiactl /dev/nvidia-uvm /dev/nvidia-uvm-tools; do
    if [ ! -c "$dev" ]; then
        echo "Missing character device: $dev" >&2
        break
    fi
    read -r major minor < <(stat -c '%t %T' "$dev")
    printf 'lxc.cgroup2.devices.allow: c %d:%d rwm\n' "$((16#$major))" "$((16#$minor))"
    printf 'lxc.mount.entry: %s %s none bind,create=file 0 0\n' "$dev" "${dev#/}"
done
Each device produces a cgroup permission and a bind mount. Check that all four devices produced entries before copying the output into the LXC configuration. UVM major numbers can change, so this reads the actual numbers instead of borrowing them from another machine.
Find the host’s driver libraries and management binary:
ldconfig -p | grep -E 'libcuda.so.1 |libnvidia-ml.so.1 |libnvidia-ptxjitcompiler.so.1 '
command -v nvidia-smi
For the usual Debian x86-64 paths, add these read-only mounts. If the lookup above reports a different source path, change the first path on that line; keep the destination path as shown. All three libraries must be present.
lxc.mount.entry: /usr/lib/x86_64-linux-gnu/libcuda.so.1 usr/lib/x86_64-linux-gnu/libcuda.so.1 none bind,ro,create=file 0 0
lxc.mount.entry: /usr/lib/x86_64-linux-gnu/libnvidia-ml.so.1 usr/lib/x86_64-linux-gnu/libnvidia-ml.so.1 none bind,ro,create=file 0 0
lxc.mount.entry: /usr/lib/x86_64-linux-gnu/libnvidia-ptxjitcompiler.so.1 usr/lib/x86_64-linux-gnu/libnvidia-ptxjitcompiler.so.1 none bind,ro,create=file 0 0
lxc.mount.entry: /usr/bin/nvidia-smi usr/bin/nvidia-smi none bind,ro,create=file 0 0
These supply CUDA’s driver interface, NVML, the PTX JIT compiler and nvidia-smi from the same host installation. This example assumes Debian x86-64 on both sides. Install the application runtime inside the LXC, not another kernel driver.
Device permissions must also allow the application’s mapped UID/GID access; a cgroup rule alone doesn’t grant filesystem permission. Run the following checks as the actual application user.
4. Test CUDA inside the LXC
Start the LXC and run nvidia-smi -L. Then, from its CUDA-enabled PyTorch environment as the application user:
import torch

assert torch.cuda.is_available(), "CUDA is unavailable"
x = torch.ones(1024, device="cuda:0")
assert (x + x).sum().item() == 2048
print(torch.cuda.get_device_name(0), "OK")
This checks that the application can allocate GPU memory and run a CUDA operation, rather than just read driver telemetry.
Docker and later upgrades
The next snag was inside Docker: the NVIDIA Container Toolkit didn’t propagate the host driver libraries through our unprivileged LXC. Explicit device and library mounts fixed that. Enable nesting and keyctl for Docker on the LXC, then add these entries to the GPU service in its Compose file:
devices:
  - /dev/nvidia0:/dev/nvidia0
  - /dev/nvidiactl:/dev/nvidiactl
  - /dev/nvidia-uvm:/dev/nvidia-uvm
  - /dev/nvidia-uvm-tools:/dev/nvidia-uvm-tools
volumes:
  - /usr/lib/x86_64-linux-gnu/libcuda.so.1:/usr/lib/x86_64-linux-gnu/libcuda.so.1:ro
  - /usr/lib/x86_64-linux-gnu/libnvidia-ml.so.1:/usr/lib/x86_64-linux-gnu/libnvidia-ml.so.1:ro
  - /usr/lib/x86_64-linux-gnu/libnvidia-ptxjitcompiler.so.1:/usr/lib/x86_64-linux-gnu/libnvidia-ptxjitcompiler.so.1:ro
  - /usr/bin/nvidia-smi:/usr/bin/nvidia-smi:ro
Merge these with the service’s existing devices and volumes. Use an image with a compatible CUDA runtime and Linux user-space, recreate that Docker service, and repeat the compute test inside it. The source paths here are inside the LXC, where the host libraries were mounted in step 3.
Stop the GPU LXC before updating the host driver or kernel. Afterwards, verify the host driver and UVM nodes, recheck the device numbers and library paths in step 3, update any changed configuration entries, then start the LXC again. Old bind mounts can retain replaced library files. Check the complete path after a host reboot too; UVM/device creation must precede LXC startup.
More than one GPU
The same arrangement works with multiple GPUs. Add its device node (for example /dev/nvidia1) to the loop in step 3 and to the Docker device list if used, then test CUDA on each visible device. That’s how the broker uses two cards. Their VRAM remains separate; splitting a model or assigning workloads to different GPUs is the application’s job.
Leave a Reply